So since I’ve been having issues with my formula 1 board

I decided to just upgrade it to the new 2.4ghz ESC board.
Things you will need if you want to do this.
1ea. RC Unit Set for 2.4 ghz. (part # MZ303). This if for the MR-02 upgrade and will need a few modifications.
Some wire to extent the ones that are short. Power wires (red/black) Power switch wires (new board they are white, old board they are black).
Soldering iron, solder, and a steady hand.
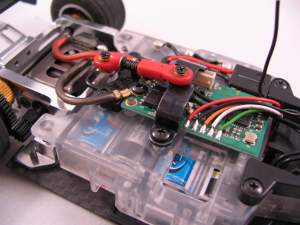
1st you need to removed the existing board from your chassis, servo motor and potometer.
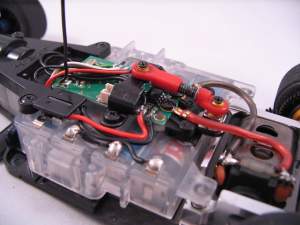
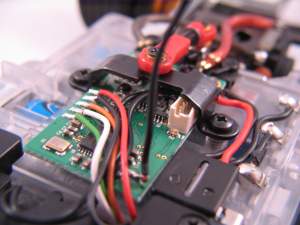
The new new board has everthing attached to it, however you will need to extend the on/off switch wires as the ones on the board are not long enough. You will also need to extend the power wires. This does required some soldering and they are very close to each other so go slow. You won’t want to short out your new board. Since I was having problems with my old board I simple removed the power switch, and the power wires that run to the battery terminals and used them.
The Pot wires are long enough, but you will need to deepen the slots that hold the wires to the servo gears. The old board has only 2 wires on the new boards there are 3 wires going to the pot.
Re route the wires installing the pot and servo motor. And install a screw to hold the board in place, then assemble the front steering components and add the top cap back on, making sure you don’t pinch any of the wires. Now you will have a couple of small issues to deal with. When you put the metal bridge piece on, You will notice that there isn’t enough room for the ICS plug that is on the new board. Some have used the front wheel bushings under it to raise it up. I simple shaved the top of the plastic plug off so it would fit in the factory locations. You’ll just want to make sure the pins in the plug don’t contact the metal, so don’t take off any more of the plug than you need to for it to fit. Now you can install you shock (if you are using one).
The second issue is an easy one, since the board is sitting different than the standard F1 board you need to reverse what side the motor wires run to. Install you body, and remember you don’t need to put that antenna back on, it’s not needed any longer.
Now pair the new board with you 2.4ghz TX and you are ready to race.

here are some pictures of the final product, it's a nice clean install with. I didn't have to change the geometry of the rear spring by racing the mount. As you can see from the pics everything went in nicely.
click on the first image to go to the gallery for full size pictures.


 Downloads
 Demo articles